Improve your Lettering Compositions with Slants and Curves
When I began to get serious about lettering, I started with the basic fundamentals. I learned letter structures, spacing, and line-weights. I also drew many simple “flat line” compositions (single or multi-line lettering pieces that have a straight baseline).
I eventually got to the point where drawing on these flat baselines felt boring and redundant. All of the lettering artists that I looked up to were producing complex compositions that involved slants and curves. The letters were warped and stretched to fill up space. These qualities brought a unique flare to their artwork. In the interest of progressing, I too begin to experiment with these more dynamic compositions.
I quickly found that it’s not as easy as it looks! After learning the hard way, I thought it might be helpful to share information that I wish I had available when I started tackling these more complex styles.
Just quick note before we jump in: it really helps to understand the basics of letterforms before adding these new dimensions. I would recommend that you’re consistently able to produce uniform letter compositions on a standard baseline before jumping in. You’ll save yourself a lot of frustration!
Drawing on Slants
First, let’s talk about drawing on slanted lines. There are several ways to do this, which I’ll get into below. But one thing worth mentioning: you’ll quickly find that when drawing on angles and curves, a lot of typographic rules go out the window. Proper execution requires understanding these fundamental rules and how to fake them in these alternative contexts so that your letters look natural.
Drawing Upright Letters on Slants
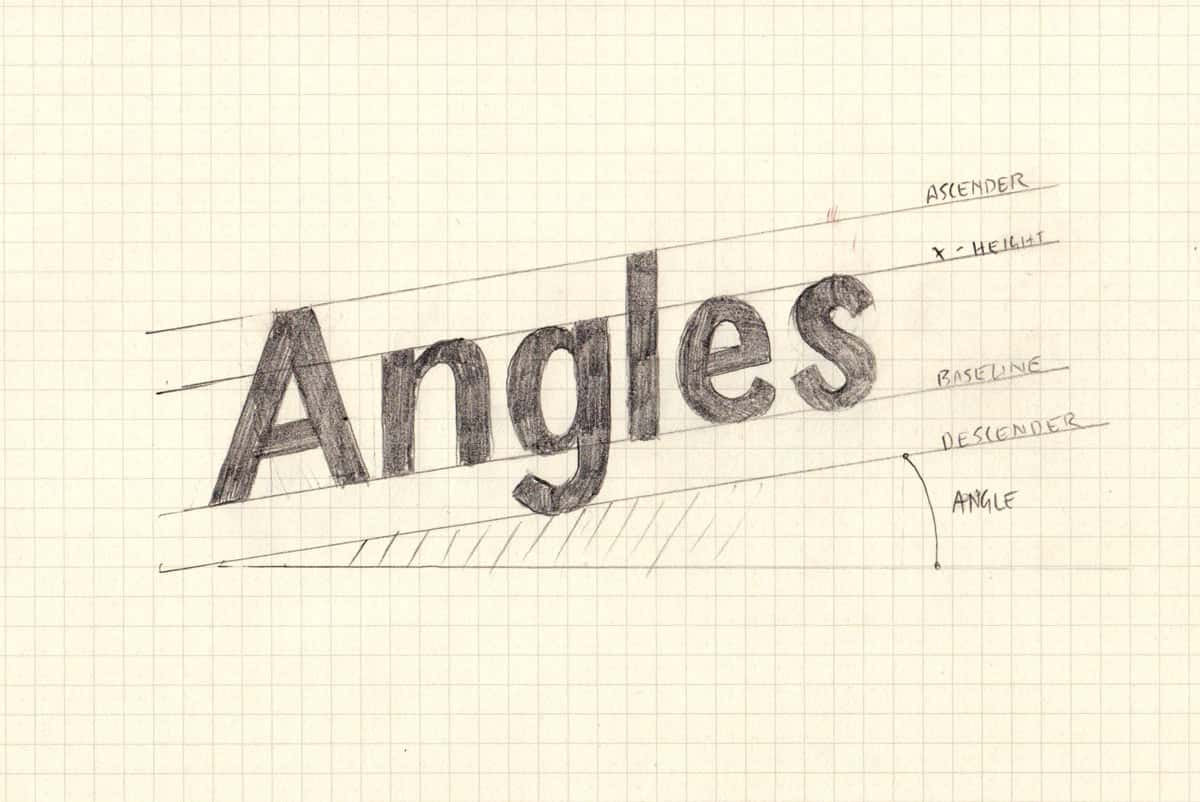
This is the best initial approach if you’re new to drawing on slants. Begin by drawing parallel lines (baseline, x-height, ascender height, and a descender, if applicable). But instead of drawing them perpendicular to the side of your page, draw them at an angle. How steep the angle is will determine how much you need to exaggerate the letter’s aesthetic qualities. In the beginning, I would recommend starting with a 20º to 30º slant.
Next, draw straight vertical lines that are parallel to the edge of the page. You’ll use these as visual guides to ensure your letters are uniform.
Finally, draw the letters as you normally would while being sensitive to the slant. Start by lightly sketching them to get the proportions correct. It might feel a bit strange to draw on a slant, but try to imagine you’re just drawing on a regular flat baseline.
Drawing Oblique Letters on Slants
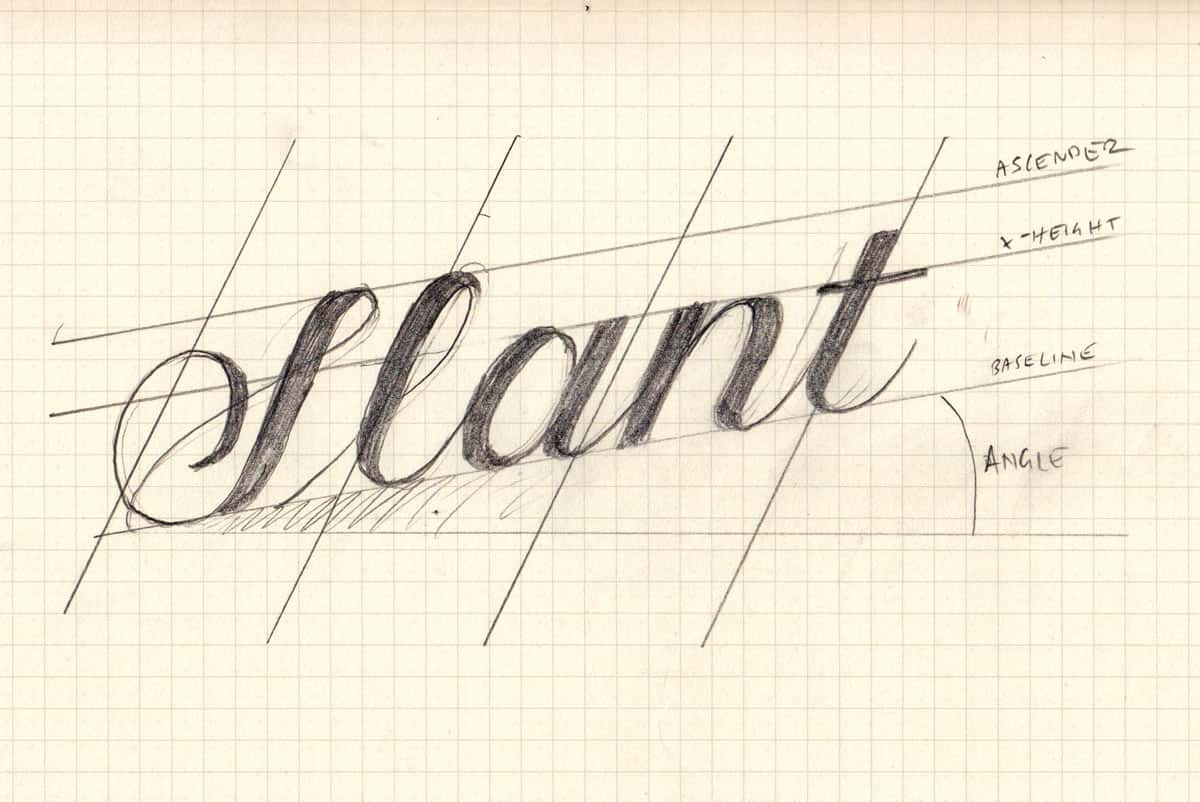
What if you want to draw italicized letters? This is very common with scripts.
It’s actually quite simple. Follow the previous exercise, but instead of using vertical guides, use a ruler to draw slanted guidelines that match the angle of your letters. Just make sure the guides are consistently parallel or else the letters will look out of whack when you try to follow them.
Drawing Warped Letters on Slants
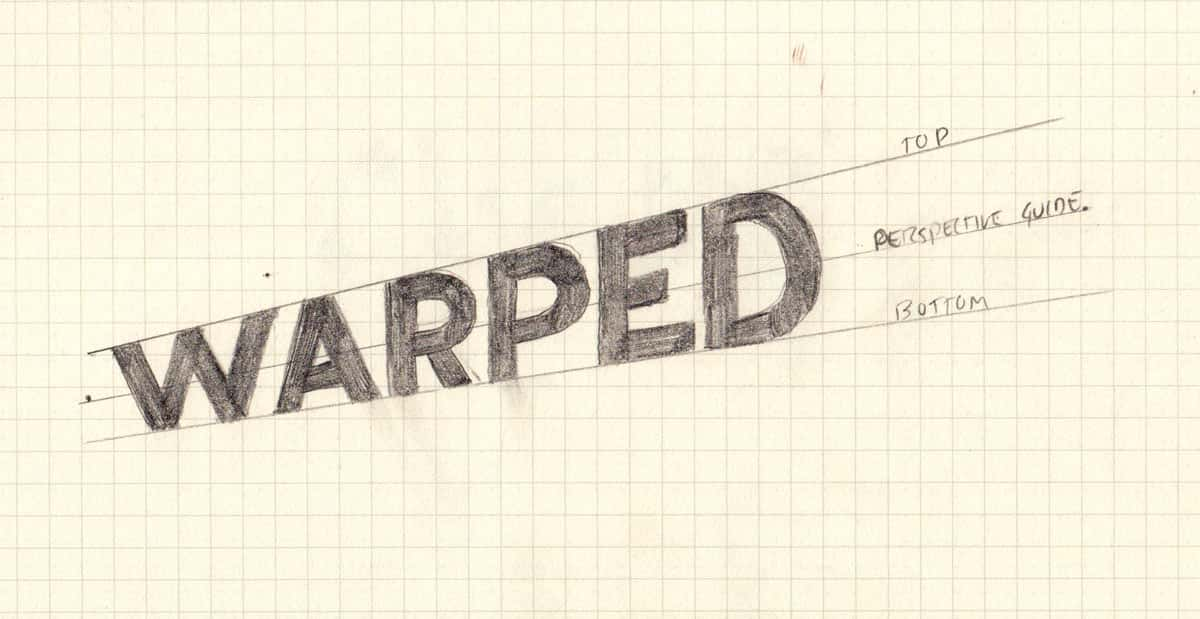
Next, let’s take the first exercise a step further. Instead of drawing your slanted lines in parallel with each other, draw them “fanned out”. In other words, if you have a baseline at a 20º slant, make the letter-height 30º. The greater the difference in degrees between the two will result in a more exaggerated warp.
It might help to draw one or more evenly distributed lines in between the two angles to help guide your letters. In the example above, I drew a single guide through the middle which helped me ensure that the letters were proportional while drawing them.
When you draw your letters, the aspect that will feel most unnatural is that the each letter you draw will not follow the same uniform height as the previous letter. That’s okay — just focus on creating an individually proportioned letter that fits within your guides.
Drawing on Curves
Drawing on curves is a little more difficult, but if you’ve gotten the hang of drawing on slants, you’ll be a natural. Your secret weapon is going to be a drafting compass. With a compass, you’ll be able to achieve perfect circular curves at a variety of radiuses.
There are two essential ways that you letters can be drawn on curves:
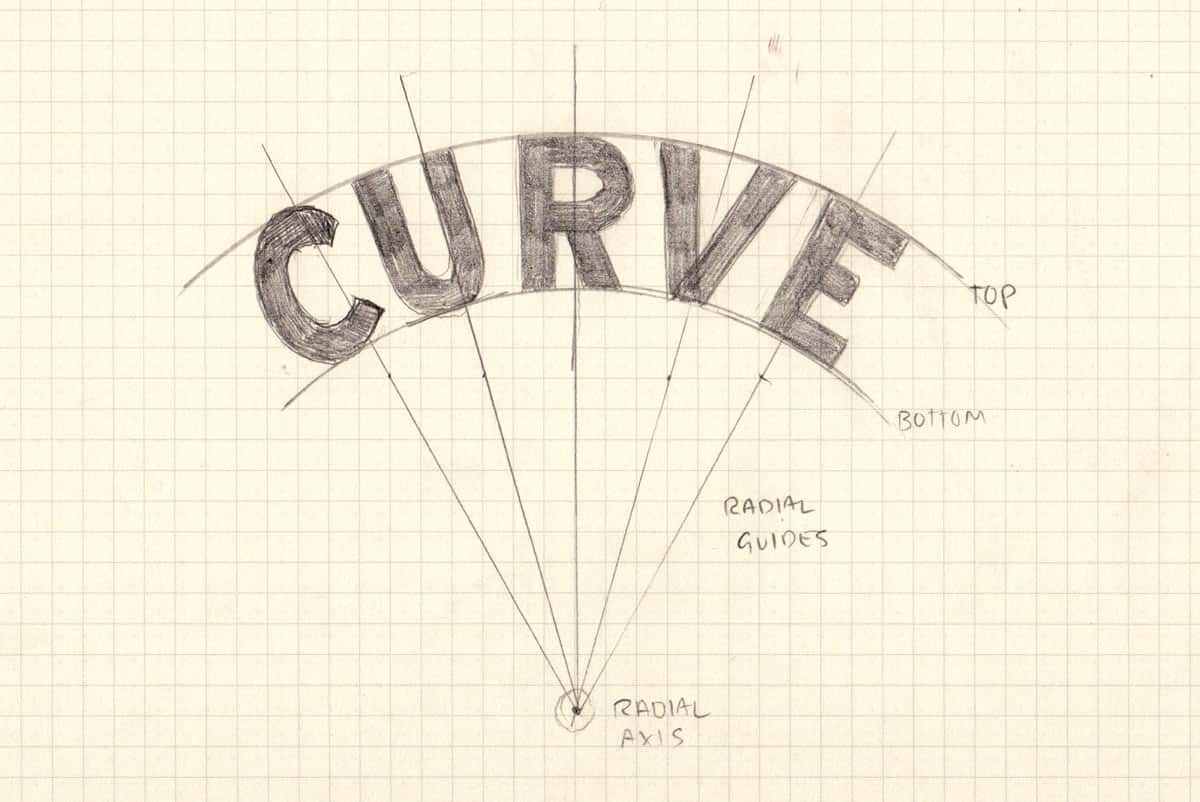
Drawing Warped Letters Letters on Curves
When drawing warped letters on a curve, the letters are always going to be vertically uniform. In other words, they don’t rotate to follow along with the baseline. Notice in the image below that the letters are constrained within their boundaries (the top line and the curved baseline).
Begin by drawing the constraints that you’re going to be working with. The possibilities here are endless. In the image above, I drew a curve that intersects a baseline as well as a top line. I then drew evenly spaced vertical guides which helped me plot distribute the letters along the curve evenly.
Roughly sketch the letters out. Don’t be too rigid at first. Start loosely and slowly build the letters.
You’ll find that some combinations of letters are much harder to write than others. But just keep practicing and you’ll quickly get more comfortable with this technique.
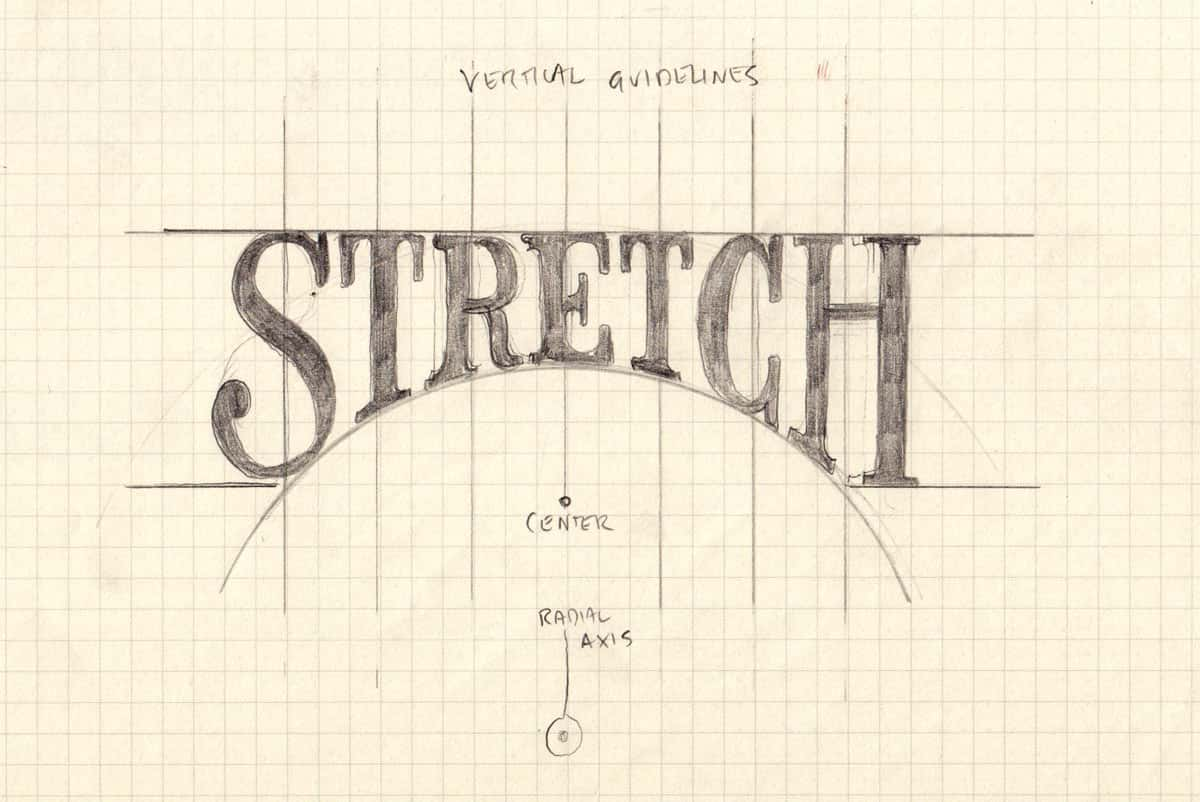
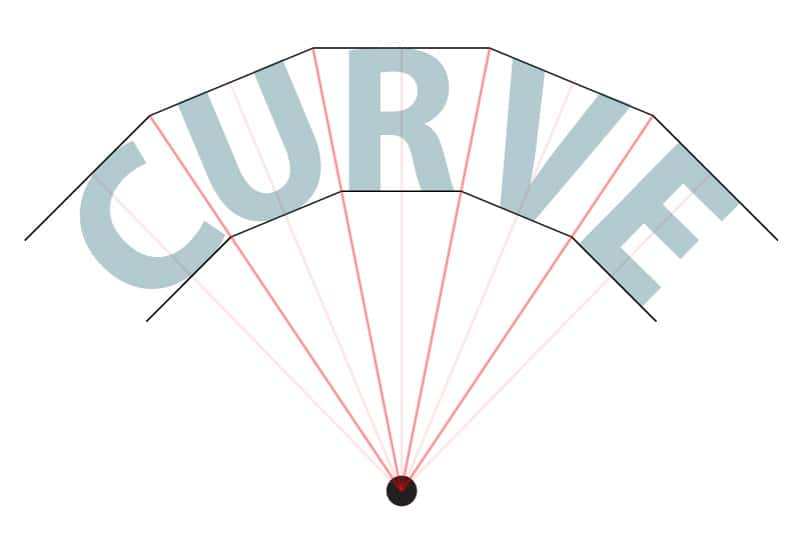
Drawing Proportional Letters on Curves
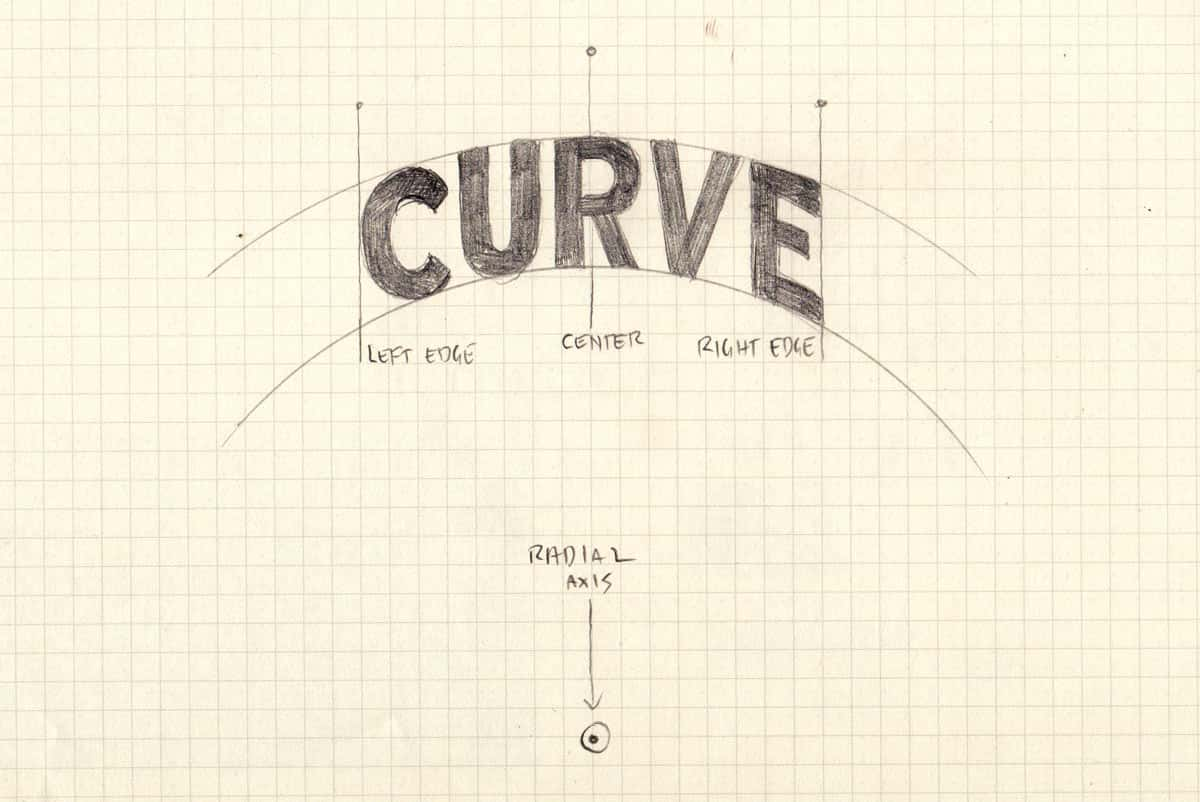
Compare the following two images:
Drawing proportional letters on curves is tougher than warped letters since each letter has a unique baseline.
To achieve this style, use your compass to create guides. From the radial axis, draw spaced guidelines that intersect the curves you’ll be drawing your letters on.
Now, instead of following vertical lines to draw warped letters, draw your letters at a rotated angle that follows the radial guides you have laid out.
Think of the point in which your radial guide intersects the baseline curve as a flat baseline in which your letter sits on:
Drawing a guide like this one would certainly work — but it’s tedious and time consuming. Instead, try to visualize it in your head while sticking to your radial guides.
Practice, Practice, Practice
Lettering on slants and curves can be difficult. But like any other challenge, practice will make it easier and easier.
Start simple and write single words in these various different styles. Once you’re comfortable with that, begin mixing these various techniques together to create beautiful compositions.